Archiv der Kategorie: HowTo

Anonym surfen unter ubuntu mit einem Klick (Vidalia&Tor)

Dieses Setup stellt eine Alternative zur Verwendung eines Proxy Addons wie TorButton dar, hat aber den Vorteil, dass mit einem einzigen Befehl oder Klick ein neuer Firefox geöffnet wird mit welchem sicher über das Tor Netwerk gesurft werden kann. Im anderen Fenster ist jedoch normales weitersurfen möglich. Sämtliche Addons und Einstellungen sind durch die Verwendung eines anderen Profils allerdings nicht verfügbar und müssen erneut installiert bzw. vorgenommen werden. Dies ist in meinen Augen allerdings ein Vorteil, da man so Profile für verschiedene Einsatzzwecke konfigurieren kann: Ein Profil zum alltäglichen surfen, ein Profil mit allen benötigten Addons zur Webentwicklung oder zur Durchführung von Pentests usw.

Installation der benötigten Pakete.

$ aptitude install tor vidalia

Vidalia starten und mit dem Tor Netzwerk verbinden. Im Control Panel das Häkchen bei „Show this window on startup“ entfernen.

In der Konsole mit dem Befehl

$ firefox -ProfileManager -no-remote

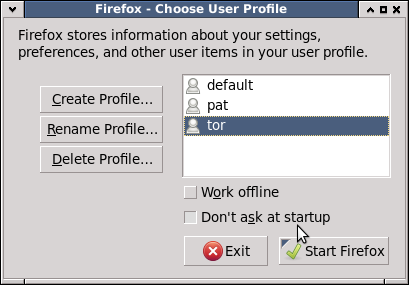
den Profilmanager von Firefox öffnen und ein neues Profil anlegen. Hier wurde es tor genannt.

In dem neu geöffneten Firefoxfenster unter Bearbeiten -> Einstellungen -> Erweitert den Reiter Netzwerk auswählen und hier auf Einstellungen klicken. Hier localhost und Port 9050 als SOCKS-Host eintragen.

In der Adresszeile about:config aufrufen und nach network.proxy.socks_remote_dns suchen. Den Wert auf true setzen. Jetzt werden auch DNS Anfragen über den eingestellten Proxy geschickt.

Ein Besuch auf https://check.torproject.org/ zeigt, ob alles korrekt funktioniert.

Jetzt noch Vidalia so konfigurieren, dass beim Start der Firefox mit dem entsprechenden Profil ausgeführt wird.
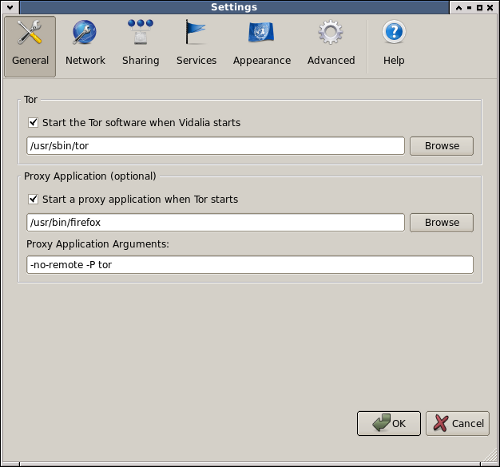
Dazu im Control Center auf Einstellungen klicken und im Reiter General das Häkchen bei „Start a proxy application when Tor starts“ setzen. Als Pfad /usr/bin/firefox eintragen und unter „Proxy Application Arguments“ die benötigten Argumente für den Firefox: -no-remote -P tor.

Zum anonymen surfen muss zukünftig nur Vidalia über das Menü oder mit

$ vidalia &

gestartet werden. Sollte vidalia bereits laufen, kann das entsprechende Firefoxprofil mit

$ firefox -no-remote -P tor

aufgerufen werden.

UPDATE: Unter bestimmten Umständen kann es zu Problemen kommen wenn beide Fenster geschlossen werden. Um sicher zu gehen, sollte man beim Aufruf des „normalen“ Firefox noch die Parameter -no-remote -P default anhängen oder in meinem Fall: -no-remote -P pat (siehe oben).

Deutsches Tastaturlayout für den Cyanogenmod auf dem HTC Dream/G1

Vor einiger Zeit habe ich die Installation des Cyanogenmod auf dem HTC Dream/T-Mobile G1 hier beschrieben. In den Standardeinstellungen ist ein englischen Tastaturlayout (QWERTY) aktiviert, so dass deutsche Umlaute nicht funktionieren. Zur Umstellung auf das deutsche QWERTZ Layout, wird ein Rechner mit Android SDK benötigt. Die Installation (für Linux) habe ich hier unter dem Punkt „Installation des Android SDK“ beschrieben.

Das Telefon per USB an den Rechner anschließen und vom tools Verzeichnis aus mittels

$ adb devices

überprüfen, ob es auch erkannt wurde. Sollte das Gerät in der Liste aufgeführt sein, muss als nächstes /system mit Schreibrechten neu gemountet werden. Anschließend wird eine shell geöffnet.

$ adb remount
$ adb shell

In die Shell folgende Zeilen kopieren:

cp /system/usr/keychars/trout-keypad-qwertz.kcm.bin /system/usr/keychars/trout-keypad-v3.kcm.bin
cp /system/usr/keychars/trout-keypad-qwertz.kcm.bin /system/usr/keychars/trout-keypad-v2.kcm.bin
cp /system/usr/keychars/trout-keypad-qwertz.kcm.bin /system/usr/keychars/trout-keypad.kcm.bin
cp /system/usr/keylayout/trout-keypad-qwertz.kl /system/usr/keylayout/trout-keypad-v3.kl
cp /system/usr/keylayout/trout-keypad-qwertz.kl /system/usr/keylayout/trout-keypad-v2.kl
cp /system/usr/keylayout/trout-keypad-qwertz.kl /system/usr/keylayout/trout-keypad.kl
reboot

Nach dem Neustart des Telefons ist das deutsche Layout aktiviert.

Quellen:

http://forum.xda-developers.com/showthread.php?t=504710

Android Entwicklung unter Ubuntu Linux – Eclipse mit ADT Plugin

Das eigene Programm auf dem neuen Mobiltelefon oder professionell Geld verdienen. Google und Android machen es einem einfach (wenn man weiß wie es geht). Google bietet neben der direkten Verwendung des Android SDK auch die Möglichkeit dieses mit dem Android Development Tools (ADT) Plug-in in die beliebte Entwicklungsumgebung Eclipse zu integrieren. Ich möchte hier die Installation und Konfiguration auf einem 64 Bit Ubuntu 10.4 Lucid Lynx beschreiben.

Installation von Eclipse

Bei Verwendung einer 64 Bit Version, werden zusätzlich die 32 Bit Bibliotheken benötigt. Unter Ubuntu installiert man diese mit

$ aptitude install ia32-libs

Außerdem wird Eclipse und das Java Development Kit (JDK) benötigt. Die aktuelle Version im Ubuntu-Repository ist 3.5.2, neuere Versionen findet man auf der Downloadseite von Eclipse, allerdings findet sich auf der Android Seite zu den Systemvoraussetzungen der Hinweis, dass die Android Development Tools mit Eclipse 3.6 (noch) nicht kompatibel ist.

Caution: There are known issues with the ADT plugin running with Eclipse 3.6. Please stay on 3.5 until further notice.

Wir bleiben also bei der 3.5.2 Version im Repository. Man hat nun Wahl zwischen verschiedenen Eclipsepaketen, wobei laut offizieller Installationsanleitung seit Eclipse 3.5 die „Eclipse Classic“ Version ausreicht. Unter Ubuntu braucht benötigt man allerdings aufgrund eines Bugs auch das „Eclipse Plug-in Development Environment“ (PDE), da die Installation eines Plug-ins (gilt auch für PDT oder CDT) mit der Fehlermeldung

Session context was:(profile=PlatformProfile,  phase=org.eclipse.equinox.internal.provisional.p2.engine.phases.Install,  operand=null –> [R]org.eclipse.cvs 1.0.400.v201002111343,  action=org.eclipse.equinox.internal.p2.touchpoint.eclipse.actions.InstallBundleAction).
The artifact file for osgi.bundle,org.eclipse.cvs,1.0.400.v201002111343 was not found.

abbricht. Installiert wird dieses zusammen mit dem benötigten Java Development Kit (JDK) mit

$ aptitude install sun-java6-jdk eclipse eclipse-pde

Installation des Android SDK

Als nächstes benötigen wir das „Android SDK Starter Paket“ mit dessen Hilfe wir die restlichen benötigten Daten installieren. Für unser Ubuntusystem laden wir uns das aktuelle Linux (i386) Paket runter. Nach dem Wechsel in den Downloadordner und Entpacken das Pakets mit

$ tar xfv android-sdk_r06-linux_86.tgz

kann, wer mag, den Ordner noch an einen anderen Ort verschieben (ich bevorzuge /opt). Allerdings ist es in diesem Fall erforderlich entweder die Zugriffsrechte oder den Besitzer des Ordners zu ändern, da wir später Schreibzugriff auf das Verzeichnis brauchen.

$ cp -r android-sdk-linux_86 /opt/
$ chown -R pat:root /opt/android-sdk-linux_86

Wer möchte, kann (nicht unbedingt erforderlich) außerdem den Verzeichnispfad /opt/android-sdk-linux_86/tools zur PATH Variablen hinzufügen und die enthaltenen Kommandozeilentools ohne Angabe des vollständigen Pfades ausführen. Dafür einfach ~/.bash_profile oder ~/.bashrc öffnen und PATH erweitern. Gibt es PATH noch nicht, folgendes in eine der beiden Dateien schreiben

$ vim ~/.bashrc
export PATH=${PATH}:/opt/android-sdk-linux_86/tools

Einrichten von Eclipse und den Android Development Tools

UPDATE: Unter Umständen kann es an diesem Punkt zu einem Fehler kommen (siehe Kommentare). Der Fehler kann allerdings recht einfach behoben werden. Im Menü Help -> Install New Software auswählen und im neuen Fenster auf den Link Available Software Sites klicken. Sollte es dort keinen Eintrag wie „Galileo Update Site“ o.ä. geben, auf Add klicken und bei Location die url http://download.eclipse.org/releases/galileo eintragen. OK und das sollte es gewesen sein. Sollte ein anderes Release als Galileo verwendet werden, findet man hier die angepassten urls.

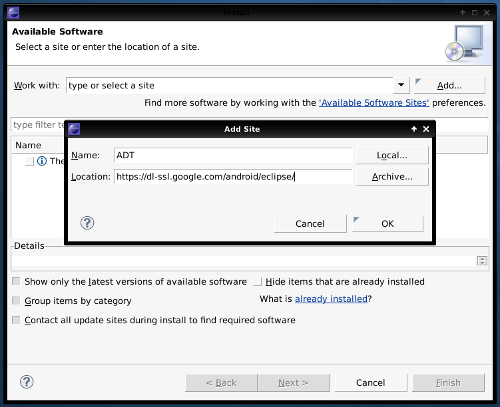
Als nächstes Eclipse starten und einen „workspace“ einrichten, hier speichert Eclipse Projekte und Quellcode. Danach die Android Development Tools (ADT) als Plug-in hinzugefügt. Dazu im Menü Help -> Install New Software auswählen und im im neuen Fenster auf Add klicken.

Repository hinzufügen

Dem Plug-in einen Namen geben (z.B. ADT) und bei Location die URL

https://dl-ssl.google.com/android/eclipse/

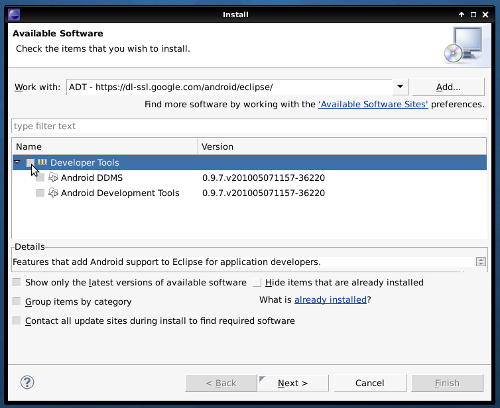
eintragen. Mit Ok bestätigen. Im Fenster sollte jetzt der Punkt „Developer Tools“ hinzugekommen sein. Links daneben das Häkchen setzen und auf Next klicken.

Developer tools

Ein weiteres Mal auf Next und nach dem bestätigen der Lizenzbestimmungen auf Finish klicken.
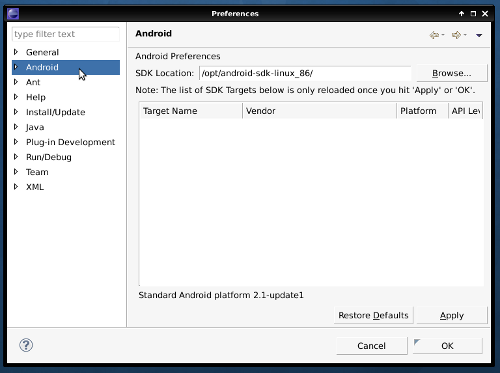
Nach der Installation und einem Neustart von Eclipse muss nun das Plug-in konfiguriert werden. Window -> Preferences im Menü auswählen und im neuen Fenster mit einem Klick auf Android im linken Menü die „Android Preferences“ öffnen. Hier den Pfad zum Android SDK (/opt/android-sdk-linux_86/) eintragen.

Hinzufügen der Entwicklungskomponenten

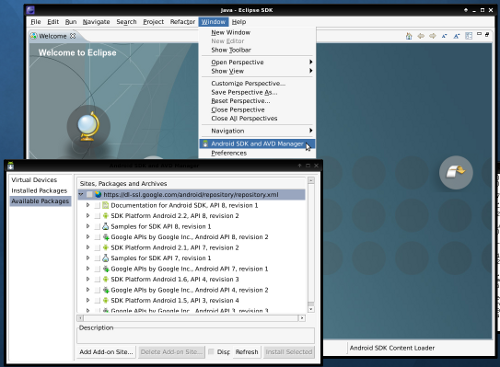
Mit Hilfe der Programme aus dem Starter Paket (Android SDK) installieren wir als letzten Schritt nun die notwendigen Komponenten. Neben mindestens einer Plattform (Android 2.2, Android 2.1 etc) empfiehlt es sich außerdem die Dokumentation zu installieren. Eine Übersicht über die einzelnen Komponenten gibt es hier. Hinzugefügt werden diese über Window -> Android SDK and AVD Manager. Nach der Auswahl von Available Packages im linken Menu kann man nun beispielsweise die Dokumentation, die SDK Platform für Android 2.2 und das zur API 8 passende Paket für die Google APIs selektieren und mit einem Klick auf Install Selected installieren. Evtl. muss man jetzt noch eine eine Lizenzbedingung für die Google APIs akzeptieren.

Hinzufügen von ADT Komponenten

Je nach Auswahl kann die Installation einige Zeit dauern. Hat man zum Abschluss Google noch mitgeteilt, ob man anonyme Nutzerdaten einschicken möchte oder nicht, kann man nun sein erstes Hello World Programm schreiben.

Quellen und weitere Informationen:
http://hackaday.com/2010/07/12/android-development-101-a-tutorial-series | Part 1 | Part 2 | Part 3
http://od-eon.com/blogs/horia/android-development-environment-setup-ubuntu-lucid/
http://developer.android.com/index.html
http://www.hak5.org/episodes/episode-711

Restricted sftp access with rssh and ssh chroot

OpenSSH 4.9 was the first version of the famous daemon that came with an built-in chroot functionality (changelog). Chrooting the sshd and restricting the shell access to a few commands can be a great solution to grant a few users secure access to exchange files. We will use the rssh shell to only allow sftp access for one user, locked to his chrooted home directory. Since it is dangerous to give a user write access to the root of a chroot, you have to create the user’s home directory inside the chroot. In this example /home/ftp will be the chroot and /home/ftp/secftp is the home directory of the user, the place where he finds himself when connecting to the machine.

Install the rssh shell with

$ aptitude install rssh

and adjust the config file for the user secftp to allow sftp access.

$ vim /etc/rssh.conf

user=secftp:027:00010 #user:umask:proto

Then add the new user secftp (with /secftp as home and /usr/bin/rssh as shell) to your system and set a password.

$ useradd -d /secftp -s /usr/bin/rssh -g users secftp
$ passwd secftp

Create the directory and adjust the ownership so secftp can read/write and other group members can read the uploaded files.

$ mkdir -p /home/ftp/secftp
$ chown secftp:users /home/ftp/secftp

Edit your sshd configuration and add the user specific options for your chroot. Don’t forget to add secftp to your AllowUsers (which you should have configured :)).

$ vim /etc/ssh/sshd_config

AllowUsers secftp

Subsystem sftp internal-sftp

Match User secftp
   ChrootDirectory /home/ftp
   AllowTCPForwarding no
   X11Forwarding no
   ForceCommand internal-sftp

Restart the sshd daemon and you should be done.

Sources:
http://www.gossamer-threads.com/lists/openssh/dev/44657
http://hp.kairaven.de/scpsftp/ssh-rssh-sftp.html
http://www.debian-administration.org/articles/590

Fully encrypted gentoo system with LUKS/cryptsetup and LVM

I have installed this setup some time ago on my system and wrote down the steps. To validate that every step is still correct I used VirtualBox and installed the system again.

At the end of this howto, you will have a full working gentoo system with (nearly) full disk encryption, coded RAM and an easily expandable disk partition schema. Full disk encryption under GNU/Linux isn’t possible like it is with e.g. Truecrypt under Windows. So in most cases you will have to leave your /boot partition unencrypted or use a removable medium like an usb stick to boot your system. In this setup we will leave /boot as it is.

What you need:

  • Backup of your running system since your disks will be erased
  • Linux compatible hardware
  • Internet connection
  • Some time
  • Experience with the GNU/Linux system is highly recommended
  • A GNU/Linux system (Live CD, usb stick, installation on other disk etc.) This howto uses the Gentoo Weekly Minimal Install CD for amd64

Although I will try, explaining every step in detail would be to much for this howto so I have to point you to Google and the Gentoo Handbook.

1. Preparing the installation

Use for example UNetbootin to create a bootable usb stick or just burn the cd. When you’re using GRUB2 on your system, you can boot the iso file directly through grub’s loopback ability. Change your BIOS settings accordingly.

2. Booting and choosing the correct keyboard layout

Boot the installation system and choose the default kernel at prompt. When all kernel modules are loaded you have the opportunity to change the keyboard layout to your needs (for german layout, type de or 10).

3. Configuring your network

Find out how your network adapters are called with ifconfig -a. To obtain an IP for the wired network link on eth0, type dhcpd eth0. To show your IP just type ifconfig eth0 and look for inet addr. To continue the installation from another computer, start the sshd server with /etc/init.d/sshd start, set a password for root with the passwd command and connect from the other computer with ssh root@IP under Linux or use Putty under Windows.

4. Preparing your harddisk(s)

At this point you have more then one possibility on how to create your disk layout, so you should be really sure what you want. If you are not sure or don’t know how to split your disk, check out the handbook again and/or search Google. You have to decide in which order your different layers occur. It is possible to create one big (physical) LVM partition, configure the logical volumes and encrypt these individually. You can also create a standard partition, encrypt the whole partition and configure your logical volumes inside your secure container. Both setups have advantages and disadvantages. The first makes it quite easy to change your LVM layout and you can different passwords for every mount point if you like. The second method has the advantage that other systems will only see one big encrypted partition and nothing else and you only need one password to decrypt the system (although this is also possible with the first setup).
In this setup we will create a small partition for /boot, a separate partition for swap and another one for the physical LVM. Maybe I will add one or two alternatives to this guide in the future, but for now I am going with the first method as I think it is the more difficult one to reproduce. Use fdisk or cfdisk to configure the harddisk(s) to your needs.

The partition table I chose for this howto

livecd ~ # fdisk -l /dev/sda
Disk /dev/sda: 21.5 GB, 21474836480 bytes
255 heads, 63 sectors/track, 2610 cylinders
Units = cylinders of 16065 * 512 = 8225280 bytes
Disk identifier: 0x00000000
Device Boot Start End Blocks Id System
/dev/sda1 * 1 61 489951 83 Linux
/dev/sda2 62 183 979965 82 Linux swap / Solaris
/dev/sda3 184 2007 14651280 8e Linux LVM

5. Loading the necessary kernel modules

You need to load the necessary kernel modules for your algorithm and cipher. Use google to learn more about algorithms and ciphers.

livecd ~ # modprobe dm-mod dm-crypt sha256

6. Create and activate the LVM Setup

First we need to create the physical volume on /dev/sda3 and a volume group called vg1 with

livecd ~ # pvcreate /dev/sda3
livecd ~ # vgcreate vg1 /dev/sda3

Next we use lvcreate to create the individual logical volumes. This step is similar to the standard partitioning process, however, since we are creating logical volumes here, it is possible to change their size later again. The chosen layout here is just a demonstration of the general functionality. The name defined with the -n flag (-L is size) is just for you, so the name doesn’t have to match the later mountpoint.

livecd ~ # lvcreate -L7G -nroot vg1
livecd ~ # lvcreate -L3G -ntmp vg1
livecd ~ # lvcreate -L3G -nhome vg1

You can use the vgdisplay or vgs command to see the remaining disk space. Check your result with lvscan.

livecd ~ # lvscan
ACTIVE ‚/dev/vg1/root‘ [7.00 GiB] inherit
ACTIVE ‚/dev/vg1/tmp‘ [3.00 GiB] inherit
ACTIVE ‚/dev/vg1/home‘ [3.00 GiB] inherit

HINT:If you need to reboot, you can reactivate the LVM setup with lvchange -a y vg1 .

7. Encrypting

Next step is to encrypt the freshly generated volumes using this short loop (easily expandable if you want to create more containers).

livecd ~ # for i in root tmp home
> do
> cryptsetup -c aes-cbc-essiv:sha256 -s 256 luksFormat /dev/vg1/$i
> done

Confirm with YES and type in your password twice per volume.
Also encrypt the swap partition during the setup process.

livecd ~ # cryptsetup create -c aes-cbc-essiv:sha256 -s 256 -d /dev/urandom swap /dev/sda2
livecd ~ # mkswap /dev/mapper/swap
livecd ~ # swapon /dev/mapper/swap

8. Open the containers and format with a filesystem

Next we open our containers and create a filesystem. The choice of the filesystem depends on your needs, see google or the gentoo handbook.

livecd ~ # for i in root tmp home
> do
> cryptsetup luksOpen /dev/vg1/$i crypt$i
> done

Put in the password for every volume.

livecd ~ # for i in root tmp home
> do
> mkfs.ext4 /dev/mapper/crypt$i
> done
livecd ~ # mkfs.ext2 /dev/sda1

Don’t forget to format the boot partition as well.

9. Create the mountpoints and mount your volumes

livecd ~ # mount /dev/mapper/cryptroot /mnt/gentoo/
livecd ~ # for i in boot tmp home
> do
> mkdir /mnt/gentoo/$i
> done
livecd ~ # mount /dev/sda1 /mnt/gentoo/boot/
livecd ~ # for i in tmp home
> do
> mount /dev/mapper/crypt$i /mnt/gentoo/$i
> done

10. Preparing the chroot

Before chrooting into the new installation directory we have to prepare a few things, e.g. setting the correct file permissions before changing the directory

livecd ~ # chmod 1777 /mnt/gentoo/tmp/
livecd ~ # cd /mnt/gentoo/

and setting the correct date.

livecd gentoo # date MMDDhhmmYYYY

Next download the needed installation files. Select the best mirror near you and download (press d in links) the latest stage3 and portage files as well as the .CONTENTS .DIGESTS and .md5sum files using links.

livecd gentoo # links http://www.gentoo.org/main/en/mirrors.xml

Latest stage3 file can be found under /releases/amd64/current-stage3/ (select the right folder for your architecture) and the latest can be found using the symlink in /snapshots/portage-latest.tar.bz2.

Verify your downloads with md5sum and extract them when there is no error.

livecd gentoo # md5sum -c stage3-amd64-20100617.tar.bz2.DIGESTS
livecd gentoo # md5sum -c portage-latest.tar.bz2.md5sum

livecd gentoo # tar xvjpf stage3-amd64-20100617.tar.bz2
livecd gentoo # tar xvjf /mnt/gentoo/portage-latest.tar.bz2 -C /mnt/gentoo/usr

Take a look at the wiki entry about CFLAGS and edit the make.conf to your needs. I use the Amd Athlon 64 64bit settings here.

livecd gentoo # nano /mnt/gentoo/etc/make.conf

CHOST=“x86_64-pc-linux-gnu“
CFLAGS=“-march=k8 -O2 -pipe“
CXXFLAGS=“${CFLAGS}“

Select the nearest mirror

livecd gentoo # mirrorselect -i -o >> /mnt/gentoo/etc/make.conf
livecd gentoo # mirrorselect -i -r -o >> /mnt/gentoo/etc/make.conf

Copy the DNS information to your chroot and mount the needed devices

livecd gentoo # cp -L /etc/resolv.conf /mnt/gentoo/etc/
livecd gentoo # mount -t proc none /mnt/gentoo/proc
livecd gentoo # mount -o bind /dev /mnt/gentoo/dev

11. Chroot into your new environment

Change into your new root and sync and update your system.

livecd gentoo # chroot /mnt/gentoo/ /bin/bash

livecd / # env-update && source /etc/profile
livecd / # emerge –sync

12. Select a profile

Select the right profile for you using eselect

livecd / # eselect profile list
Available profile symlink targets:
[1] default/linux/amd64/10.0 *
[2] default/linux/amd64/10.0/desktop
[3] default/linux/amd64/10.0/desktop/gnome
[4] default/linux/amd64/10.0/desktop/kde
[5] default/linux/amd64/10.0/developer
[6] default/linux/amd64/10.0/no-multilib
[7] default/linux/amd64/10.0/server
[8] hardened/linux/amd64/10.0
[9] hardened/linux/amd64/10.0/no-multilib
[10] selinux/2007.0/amd64
[11] selinux/2007.0/amd64/hardened
[12] selinux/v2refpolicy/amd64
[13] selinux/v2refpolicy/amd64/desktop
[14] selinux/v2refpolicy/amd64/developer
[15] selinux/v2refpolicy/amd64/hardened
[16] selinux/v2refpolicy/amd64/server
livecd / # eselect profile set 2

13. Adjust make.conf

Adjust the make.conf file to your needs and set the needed USE flags, languages and devices

livecd / # nano /etc/make.conf
MAKEOPTS=“-j2″

USE=“3dnow 3dnowext a52 aac acl acpi alsa -amd64 apache2 -avahi
avi bluetooth -beagle cairo cdb cddb cdparanoia cdr cli cracklib
crypt css -cups daap dbus dga directfb dri dts dvb dvd dvdr dvdread -eds
-emboss encode -esd -evo exif fam ffmpeg flac ftp gdbm     gif -gnome gstreamer gtk
hal -ipv6 -isdnlog -joystick -kde libnotify lirc lm_sensors mad mmx mmxext mp3
mpeg mysql ncurses nls ogg opengl pdf png -ppds -pppd qt3 qt3support quicktime samba sdl sse sse2
ssl svg tiff transcode unicode usb v4l vcd vorbis wma
X x264 xcomposite xine xml xorg xv xvid xvmc zlib“

LINGUAS=“de en“

INPUT_DEVICES=“keyboard mouse“
VIDEO_CARDS=“vesa“

14. Configure your charsets

Define (uncomment) and generate the needed charsets incl. UTF-8 (german)

livecd / # nano /etc/locale.gen
en_US ISO-8859-1
en_US.UTF-8 UTF-8
de_DE ISO-8859-1
de_DE@euro ISO-8859-15
de_DE.UTF-8 UTF-8

livecd / # locale-gen

15. Setting the timezone

Find the right timezone for you and copy it

livecd / # ls /usr/share/zoneinfo/
livecd / # cp /usr/share/zoneinfo/Europe/Berlin /etc/localtime

16. Installation of kernel sources and other needed pakets

Install the kernel sources and other pakets that are needed for your setup

livecd / # emerge -av gentoo-sources
livecd / # emerge -av genkernel cryptsetup lvm2

17. Compile your own kernel

The next step is one of the most important. Take care that you include everything in your kernel that you need for your hardware to work. Use genkernel to make life a little bit easier.

livecd / # cd /usr/src/linux
livecd linux # genkernel –no-clean –menuconfig –save-config –luks –lvm all

You can use the kernel configuration of the gentoo live cd as a basis for your own configuration. Just copy the config file before running genkernel.

livecd linux # zcat /proc/config.gz > /usr/share/genkernel/arch/x86_64/kernel-config

The most important kernel options for this guide to add. You might need others depending on the chosen cipher etc. Don’t forget to enable Ext4 support if you need it.

Device Drivers  —>
Multi-device support (RAID and LVM)  —>
[*] Multiple devices driver support (RAID and LVM)
< >   RAID support
<*>  Device mapper support
<*>  Crypt target support

File Systems —>
<*>  The Extended 4 (ext4) filesystem

Cryptographic API  —>
<*>  SHA256 digest algorithm
<*>  AES cipher algorithms

I found a few postings on the net saying, that genkernel needs a valid /etc/fstab to build a correct initramfs. Do step 19 first to be 100% safe.

18. Kernel Modules

List the compiled kernel modules with

livecd linux # find /lib/modules/<kernel version>/ -type f -iname ‚*.o‘ -or -iname ‚*.ko‘ | less

and add them to your /etc/modules.autoload.d/kernel-2.6.

19. Edit the /etc/fstab

# <fs>                  <mountpoint>    <type>          <opts>          <dump/pass>
/dev/sda1               /boot           ext2            noauto,noatime  1 2
/dev/mapper/swap        none            swap            sw              0 0
/dev/mapper/cryptroot   /               ext4            noatime         0 0
/dev/mapper/crypthome   /home           ext4            noatime         0 1
/dev/mapper/crypttmp    /tmp            ext4            noatime         0 2
/dev/cdrom              /mnt/cdrom      auto            noauto,ro       0 0
shm                     /dev/shm        tmpfs           nodev,nosuid,noexec     0 0

20. Basic system configuration

Setting a hostname

livecd / # nano /etc/conf.d/hostname

Setting the root password. Important: This password is inside your chroot and for your future system, the password you set at the beginning was just needed for ssh access to the box! If you don’t set it, you won’t be able to login.

livecd / # passwd

System information like default editor or windows manager

livecd / # nano /etc/rc.conf

Change the keymap and timezone

livecd / # nano /etc/conf.d/keymaps
KEYMAP=“de“

Setting the clock

livecd / # nano /etc/conf.d/clock
TIMEZONE=“Europe/Berlin“

Installing some system tools (logger, filesystem tools etc.)

livecd / # emerge -av syslog-ng logrotate pciutils gentoolkit

Start the system logger at boot

livecd / # rc-update add syslog-ng default

Networking: Installing a dhcp client

livecd / # emerge -av dhcp

21. Installing the bootloader GRUB

Another really important part is the installation of a bootloader. Take care that you use the correct devices, partitions and paths – double check! If you want or need the features of GRUB 2 take a look at this page.

livecd / # emerge -av grub

Now you need to find out the exact file names for your kernel and initramfs and edit /boot/grub/grub.conf accordingly.

livecd / # ls /boot/initramfs* /boot/kernel*
-rw-r–r– 1 root root 1814297 Jul 24 00:14 /boot/initramfs-genkernel-x86_64-2.6.34-gentoo-r1
-rw-r–r– 1 root root 4261424 Jul 24 00:13 /boot/kernel-genkernel-x86_64-2.6.34-gentoo-r1

livecd / # nano /boot/grub/grub.conf

title Gentoo Linux 2.6.34-r1
root (hd0,0)
kernel /boot/kernel-genkernel-x86_64-2.6.34-gentoo-r1 root=/dev/ram0 crypt_root=/dev/vg1/root init=/linuxrc splash=silent dolvm
initrd /boot/initramfs-genkernel-x86_64-2.6.34-gentoo-r1

Creating /etc/mtab

livecd / # grep -v rootfs /proc/mounts > /etc/mtab

Installing GRUB

livecd / # grub-install –no-floppy /dev/sda

If this doesn’t work for you, try running grub manually

livecd / # grub
root (hd0,0)
setup (hd0)
quit

22. LVM configuration

The LVM process scans all connected drives for volumes. You can define a filter so that only the needed block devices are scanned.

livecd / # nano /etc/lvm/lvm.conf
filter = [ „a|/dev/sda|“, „r/.*/“ ]

23. LUKS/dm-crypt configuration

Next we edit /etc/conf.d/dmcrypt and define which encrypted containers should be opened and with which name. We will use a keyfile to decrypt the volumes.

livecd / # nano /etc/conf.d/dmcrypt

## swap
swap=swap
source=’/dev/sda2′
options=‘-c aes-cbc-essiv:sha256 -s 256 -d /dev/urandom‘

## /home with keyfile
target=crypthome
source=’/dev/mapper/vg1-home‘
key=’/root/hdpw‘

## /tmp with keyfile
target=crypttmp
source=’/dev/mapper/vg1-tmp‘
key=’/root/hdpw‘

Generating the keyfile. This can take some time depending on the activities on your box.

livecd / # dd if=/dev/random of=/root/hdpw bs=1 count=512
livecd / # chmod 400 /root/hdpw

Adding the generated keyfile to the known and valid keys in the LUKS keyring. After this step you can open your containers either using the password defined in step 7 or this file.

livecd / # for i in home tmp
> do
> cryptsetup luksAddKey /dev/vg1/$i /root/hdpw
> done

24. Finish the installation and clean up

Delete the installation files.

livecd / # rm /stage3-* /portage-*

Exit the chroot and unmount all devices.

livecd / # exit
livecd gentoo # cd ..
livecd mnt # umount /mnt/gentoo/*
livecd mnt # umount /mnt/gentoo

Close the LUKS containers and deactivate your LVM.

livecd mnt # for i in home tmp root
> do
> cryptsetup luksClose crypt$i
> done

livecd mnt # lvchange -a n vg1

Restart and pray! :)

livecd mnt # shutdown -r now

25. Success!

Welcome to your new system. Log in with the username root and password set in step 20.

26. Some more basic configuration

Start the SSH daemon at boot.

gentoo ~ # rc-update add sshd default

Synchronize your portage tree and make an update.

gentoo ~ # emerge –sync
gentoo ~ # emerge -avDuN world
gentoo ~ # env-update && source /etc/profile

Install ntp to sync your systemtime on boot.

gentoo ~ # emerge -av ntp

gentoo ~ # nano /etc/conf.d/ntp-client
NTPCLIENT_OPTS=“-s -b -u
0.de.pool.ntp.org 1.de.pool.ntp.org
2.de.pool.ntp.org 3.de.pool.ntp.org“

gentoo ~ # rc-update add ntp-client default

Clean your system and check for consistency and errors.

gentoo ~ # emerge –clean
gentoo ~ # revdep-rebuild

Root des HTC Dream/T-Mobile G1 – Cyanogenmod 5.0.8

Das HTC Dream (in Deutschland als G1 bekannt) war das erste Mobiltelefon mit Googles Android Betriebsystem. Die Leistung und Ausstattung des Telefons ist allerdings bereits jetzt werkseitig nicht mehr ohne weiteres ausreichend um das neuste Android flüssig laufen zu lassen. Wer sich allerdings nicht mit der offiziell aktuellsten Version 1.6 für das G1 zufrieden geben möchte, muss auf ROMs ausweichen wie z.B. Cyanogenmod.

Cyanogenmod is a free, community built distribution of Android 2.2 which greatly extends the capabilities of your phone.“

Da der Mod für Android Version 2.2 (Froyo) noch recht unstabil ist, habe ich mich für die Installation von CyanogenMod-5.0.8 (Android 2.1 – Eclair) auf meinem G1 entschieden. Wer diese Version dennoch testen möchte, findet hier eine passende Anleitung.
Um nicht alle im weiteren verwendete Dateien einzeln runterladen zu müssen, habe ich diese in ein Paket gepackt. Man kann entweder alle Dateien aus dem Paket auf einmal auf die SD Karte kopieren (Umbenennen nötig!) oder Schritt für Schritt die im Text verlinkten Dateien runterladen und/oder kopieren. Es ist natürlich möglich, dass es in der Zwischenzeit neuere Versionen gibt.

An dieser Stelle möchte ich darauf hinweisen, dass ich keinerlei Verantwortung für Schäden jeder Art übernehme. In fast allen hier verwendeten Quellen (siehe unten) wird ausdrücklich auf das strenge Befolgen der Anweisungen hingewiesen. Im schlimmsten Fall dient das Telefon nachher nur noch als Flaschenöffner, daher lieber bei Unklarheit nochmal in den angegeben Quellen nach einer vielleicht deutlicheren Formulierung suchen oder in den Kommentaren oder per E-Mail nachfragen. Vor der Installation sollte man in jedem Fall alle Daten sichern. Ich habe sowohl mittels MyBackup Pro ein Onlinebackup als auch direkt über USB eine Sicherung der Daten angefertigt.

Da scheinbar besonders bei Verwendung der originalen 2GB SD Karte häufig die Meldung „not allowed“ beim Flashen im Bootloader erscheint, beschreibe ich hier direkt die Erstellung einen Goldcard um dieses Problem zu beheben. Die Goldcard wird mit Hilfe einer Identifikationsnummer (CID) der SD Karte erstellt und erlaubt es anschließend Softwareeinspielungen vorzunehmen. Dazu müssen wir zu Beginn die CID auslesen.

  • Als erstes muss unter Menü -> Einstellungen -> SD-Karte und Speicher -> SD-Karte entnehmen -> SD-Karte formatieren die SD Karte formatiert werden. Mit dem Linda File Manager oder ASTRO File Manager (beides im Market zu finden) navigiert man anschließend zu sys/class/mmc_host/mmc1/mmc1:aaaa. Hier kann auch anstatt aaaa beispielsweise bbbb stehen. Die Datei cid öffnen und die Nummer abtippen. Hat man keinen Texteditor oder ähnliches zur Verfügung, kann man sich die Datei aus der Anwendung heraus auch per E-Mail schicken und spart sich so das Abtippen. Eine alternative Möglichkeit zum Herausfinden der CID ist die Verwendung des  Terminal Emulator. Eine entsprechende Anleitung gibt es hier. Die CID muss nun paarweise umgedreht werden. Dazu am Besten diesen Online Converter verwenden. Als nächstes lassen wir uns auf http://revskills.de/pages/goldcard.html unter Angabe der umgeschriebenen CID und E-Mail Adresse, ein goldcard.img per E-Mail zuschicken. (Da diese Datei von der verwendeten Speicherkarte abhängig ist, ist sie nicht im Paket enthalten). Die Datei speichern und mittels dd if=goldcard.img of=/dev/sdd bs=512 auf die SD Karte schreiben, wobei /dev/sdd die nicht(!) gemountete SD Karte am PC ist.
  • Anschließend die Cupcake Update.zip in update.zip umbenennen und zusammen mit DREAIMG.NBH auf die Karte kopieren.
  • Die SD Karte aushängen und das Telefon ausschalten. Kamera– und Powerknopf gleichzeitig gedrückt halten bis der Bootloader erscheint und den Anweisungen folgen (Der Actionkey ist der Trackball). Sobald der Vorgang beendet ist wird durch gleichzeitiges drücken von Menu, Power und Telefonhörer neugestartet.
  • Da die update.zip bereits auf der Karte ist, beim Neustart die Home- und Powertaste gedrückt halten bis das Warndreieck erscheint. Mit ALT + L wird das Menu angezeigt und mit ALT + S das Update installiert. Mit Home- und Zurücktaste wird anschließend neugestartet.
  • Dem Einrichtungsassistent folgen und mit dem Googlekonto verbinden. Evtl. muss hierfür ein neuer APN eingetragen werden. Die benötigten Einstellungen für den eigenen Provider findet man schnell bei Google.
  • Die Dateien FlashRec.apk und recovery-RA-dream-v1.7.0.img runterladen (wenn nicht das Paket genutzt wurde) und auf die SD Karte kopieren. Letztere in recovery.img umbenennen! Im Market den Linda File Manager wieder installieren und starten. Zur SD Karte wechseln und flashrec-1.1.3-20091107-2.apk installieren. Das Programm anschließend starten und auf Backup Recovery Image klicken, anschließend im Textfeld /sdcard/recovery.img eingeben und Flash Recovery Image auswählen. Sobald der Vorgang beendet ist, das Telefon ausschalten.
  • Beim Neustart Home und Power gedrückt halten bis das Recoverymenu erscheint. Hier [Alt+P] Partition sdcard -> [Alt+0] Partition SD auswählen und folgende Werte setzen: Swap-size = 96 MB, Ext2-size = 412 MB. FAT32-size ist dann automatisch Remainder. Anschließend nacheinander [Alt+2] SD:ext2 to ext3 und [Alt+3] SD:ext3 to ext4 auswählen.
  • Wieder im Hauptmenu [Alt+T] USB-MS toggle auswählen und die neuste Radio Version, Google Apps, DangerSPL und CM-5.0.8 auf die SD Karte kopieren. USB wieder deaktivieren und mittels [Alt+F] Flash zip from sdcard und der Auswahl von G1-radio-2_22_23_02.zip das neuste Radio installieren. Neustarten und die Home-Taste gedrückt halten um wieder ins Recoverymenu zu gelangen. [Alt+F] Flash zip from sdcard und diesmal spl-signed.zip auswählen.
  • Nach einem weiteren Neustart (Home und Zurück) wählt man im Recoverymenu den Punkt [Alt+W] Wipe -> [Alt+0] Wipe data/factory reset. Mit [Alt+F] Flash zip from sdcard wird anschließend update-cm-5.0.8-DS-signed.zip und direkt danach gapps-ds-ERE36B-signed.zip installiert. Ein letzter Neustart mit Home und Zurück und man sollte den Android Einrichtungsassistenten vorfinden.

Viel Spaß!

Update 13.08.2010 HowTo: Deutsches Tastaturlayout

Quellen:
forum.xda-developers.com – Cyanogenmod-5 For Dream/Magic – V5.0.8
forum.xda-developers.com – [Recovery] RA-dream-v1.7.0
Howto root HTC G1/Dream unter Mac OS X und Linux
http://theunlockr.com/2010/04/26/how-to-root-the-htc-g1dream/
http://theunlockr.com/2010/04/26/how-to-load-a-custom-rom-on-the-htc-g1-dream/
http://wiki.cyanogenmod.com/index.php?title=Full_Update_Guide_-_HTC_Dream
http://wiki.cyanogenmod.com/index.php?title=DangerSPL_and_CM_5_for_Dream
http://www.androidpit.de/de/android/wiki/view/Goldcard_erstellen
http://hexrev.soaa.me/

Backup von MySQL Datenbanken

Warum das Rad neu erfinden, wenn es schon ein zuverlässiges Skript zum automatischen Sichern der MySQL Datenbanken gibt? WipeOut’s – Automatic MySQL Backup
Aktuelle Version von Sourceforge runterladen und einige Informationen eintragen.

USERNAME=wordpressBackup
PASSWORD=P@ssw0rd
DBHOST=localhost
DBNAMES=“wordpress“
BACKUPDIR=“/var/backups/db“

Mit der Option DBNAMES ist es möglich einzelne Datenbank aufzulisten oder mittels „ALL“ alle zu sichern. Dies bietet sich z.B. an, wenn man die Rechte des Backup-Users auf die jeweilige Datenbank beschränken möchte.
Neben einigen erweiterten Optionen bietet das Skript die Möglichkeit einen Bericht oder die Sicherungen an eine angegebene E-Mail Adresse zu schicken.

MAILCONTENT=“files“
MAILADDR=“root@carrier-lost.org“

Das angepasste Skript zum Abschluss noch ins /etc/cron.daily/ Verzeichnis kopieren und testweise ausführen.

Running TweetDeck on the Linux XFCE desktop

Update: For a full tutorial on how to setup Adobe Air and Tweetdeck on 64bit Ubuntu, take a look here.

Starting TweetDeck on a Linux desktop other then Gnome or KDE will result in the error message

Oops, TweetDeck can’t find your data

because TweetDeck doesn’t support them by default. But you only get to know about it, when starting from the command line

Unknown desktop manager, only Gnome and KDE are supported

To use TweetDeck you need e.g. a running gnome-keyring-daemon, otherwise TweetDeck doesn’t know how to save your account/password information. To start TweetDeck change the DIRNAME to your needs and use this script.

#!/bin/bash
GNOME_KEYRING=`pidof gnome-keyring-daemon`
DIRNAME=“/opt/TweetDeck/bin“
GNOME_DESKTOP_SESSION_ID=$GNOME_KEYRING $DIRNAME/TweetDeck &

Virtual Box: Shared Folder on Linux host and Linux guest

Much like setting up a shared folder on a Linux host and a Windows guest, you need to create the folder to share on your host system and add it to your shared folders list in Virtualbox. You also need a mountpoint inside your virtual system (in this case: /mnt/VirtualBoxExchange).
Mounting it is done with the command

mount -t vboxsf VirtualBoxExchange /mnt/VirtualBoxExchange

Done.

Using a SSH config file

Create the config file in your .ssh directory if it doesn’t already exist.

touch /home/pat/.ssh/config

Open the file and add your configuration:

Host xmp
HostName example.com
User username
Port 2222

Where Host is the name of the shortcut. You can also add other options like

PubkeyAuthentication yes
PasswordAuthentication no
ServerAliveInterval 25
ServerAliveCountMax 150

or another Host to your configuration. Take a look at the ssh_config manpage for more options.
You can now use your shortcut with

ssh xmp