QNAP NAS: Volle Festplatte und keine Reaktion mehr

Da ist mir wohl ein Script etwas Amok gelaufen und hat die Festplatten vom Qnap volllaufen lassen. Merkwürdigerweise kann man dann mit so einem Qnap nicht mehr wirklich viel anfangen. Verbindung über das Webinterface oder SSH funktionieren zwar noch, versucht man allerdings Dateien zu löschen, hängt sich das System auf. Die wohl einzige Lösung ist etwas unschön, aber funktioniert.

  • Qnap ausschalten (Stecker ziehen, da shutdown Befehle ignoriert werden)
  • Alle Festplatten ausbauen
  • Qnap einschalten
  • Kurzen und langen Piepton abwarten (kann ca. eine Minute dauern)
  • Alle Festplatten wieder rein
  • Per SSH mit dem NAS verbinden. Benutzer: admin, Passwort: admin. (Das NAS besorgt sich per DHCP eine andere als die konfigurierte IP. Entweder im Log des DHCP-Servers nachschauen oder den QNAP QFinder verwenden)
  • Per SSH: storage_boot_init 2
  • cd /share/MD0_DATA
  • Mit rm einige Dateien löschen
  • reboot

Nach dem Neustart ist das NAS wieder über die konfigurierte IP erreichbar.

Raspberry Pi: Owncloud setup revisited

The Raspberry and owncloud ran for a few months now and I really enjoyed my own personal cloud. But I was really annoyed by the poor performance. One possible solution was to switch the sd card, which I did. I replaced the Transcend 16GB SDHC card with a 4GB one. Performance is much better now. Since setting up the system is a pretty simple and fast process, I didn’t bother about cloning the card etc. I reinstalled raspbian and followed my own guide on how to setup nginx and php and oriented on my other tutorial on how to install owncloud 6 beta. Of course I needed to change some links etc.

Some more things (I) changed:

  1. owncloud added security for trusted domains
  2. moved owncloud storage to an external usb drive
  3. changed the nginx webserver configuration: restrict to https only and …
  4. accessing php-fpm through network socket


1. If you access the webinterface of your owncloud instance using different ips, names etc., you need to add them to the „trusted_domains“ parameter.

pi@raspberrypi ~ $ sudo vi /var/www/owncloud/config/config.php

‚trusted_domains‘ =>
array (
0 => ‚192.168.12.34′,
1 => ‚your.dyndns.org‚,
),

2. Connect the usb drive and use lsblk and blkid to find the needed UUID.

pi@raspberrypi ~ $ lsblk && blkid
NAME MAJ:MIN RM SIZE RO TYPE MOUNTPOINT
sda 8:0 0 2,7T 0 disk
└─sda1 8:1 0 2,7T 0 part /media/usb
mmcblk0 179:0 0 3,7G 0 disk
├─mmcblk0p1 179:1 0 56M 0 part /boot
└─mmcblk0p2 179:2 0 3,7G 0 part /
/dev/mmcblk0p1: SEC_TYPE=“msdos“ LABEL=“boot“ UUID=“7D5C-A285″ TYPE=“vfat“
/dev/mmcblk0p2: UUID=“5d18be51-3217-4679-9c72-a54e0fc53d6b“ TYPE=“ext4″
/dev/sda1: LABEL=“Backup3TB“ UUID=“1D3F163D4EEC069E“ TYPE=“ntfs“

Create the mountpoint /media/usb and edit /etc/fstab to mount the drive on startup.

pi@raspberrypi ~ $ sudo mkdir /media/usb

pi@raspberrypi ~ $ sudo vi /etc/fstab
proc /proc proc defaults 0 0
/dev/mmcblk0p1 /boot vfat defaults 0 2
/dev/mmcblk0p2 / ext4 defaults,noatime 0 1
UUID=1D3F163D4EEC069E /media/usb ntfs-3g defaults,auto, uid=pi,gid=wwwdata,umask=007,users 0 0

While setting up your owncloud, you can now define /media/usb as your data storage. Not sure if there is a way to change this on a already running owncloud setup.


3. Change the nginx configuration (/etc/nginx/sites-availabe/default) according to the owncloud 6 documentation

upstream php-handler {
server 127.0.0.1:9000;
}

server {
listen 80;
return 301 https://your.dyndns.org$request_uri; # enforce https
}

# HTTPS server
#
server {
listen 443 ssl;
server_name your.dyndns.org localhost;

root /var/www;

autoindex off;
index index.php index.html index.htm;

ssl on;
ssl_certificate /etc/nginx/conf.d/ssl/server.crt;
ssl_certificate_key /etc/nginx/conf.d/ssl/server.key;

client_max_body_size 10G; # set max upload size
fastcgi_buffers 64 4K;

rewrite ^/caldav(.*)$ /remote.php/caldav$1 redirect;
rewrite ^/carddav(.*)$ /remote.php/carddav$1 redirect;
rewrite ^/webdav(.*)$ /remote.php/webdav$1 redirect;

index index.php;
error_page 403 /core/templates/403.php;
error_page 404 /core/templates/404.php;

location = /robots.txt {
allow all;
log_not_found off;
access_log off;
}

location ~ ^/(data|config|\.ht|db_structure\.xml|README) {
deny all;
}

location / {
# The following 2 rules are only needed with webfinger
rewrite ^/.well-known/host-meta /public.php?service=host-meta last;
rewrite ^/.well-known/host-meta.json /public.php?service=host-meta-json last;

rewrite ^/.well-known/carddav /remote.php/carddav/ redirect;
rewrite ^/.well-known/caldav /remote.php/caldav/ redirect;

rewrite ^(/core/doc/[^\/]+/)$ $1/index.html;

try_files $uri $uri/ index.php;
}

location ~ ^(.+?\.php)(/.*)?$ {
try_files $1 =404;

include fastcgi_params;
fastcgi_param SCRIPT_FILENAME $document_root$1;
fastcgi_param PATH_INFO $2;
fastcgi_param HTTPS on;
fastcgi_pass php-handler;
}

# Optional: set long EXPIRES header on static assets
location ~* ^.+\.(jpg|jpeg|gif|bmp|ico|png|css|js|swf)$ {
expires 30d;
# Optional: Don’t log access to assets
access_log off;
}
}

4. Modify the php5-fpm config to listen on a netsocket.

 pi@raspberrypi ~ $ sudo vi /etc/php5/fpm/pool.d/www.conf

;listen = /var/run/php5-fpm.sock
listen = 127.0.0.1:9000

Restart the services.

pi@raspberrypi ~ $ sudo service php5-fpm restart
pi@raspberrypi ~ $ sudo service nginx restart


Unterordner in WordPress ausschließen – .htaccess

Sämtliche Ordner einer Domain mit installierten WordPress, werden normalerweise mittels RewriteRules von WordPress verwaltet. Möchte man einen bestimmten Unterordner davon auschließen, muss die .htaccess Datei entsprechend angepasst werden. In diesem Beispiel ist WordPress direkt im DocumentRoot unter www.carrier-lost.org installiert. Soll z.B. ein Unterordner www.carrier-lost.org/static/ ausgeschlossen werden, sähe der entsprechende Abschnitt in der .htaccess so aus:

# BEGIN WordPress
<IfModule mod_rewrite.c>
RewriteEngine On
RewriteBase /
RewriteRule ^index\.php$ – [L]
RewriteCond %{REQUEST_URI} !^/(static|static/.*)$
RewriteCond %{REQUEST_FILENAME} !-f
RewriteCond %{REQUEST_FILENAME} !-d
RewriteRule . /index.php [L]
</IfModule>
# END WordPress

QNAP TS419U+ und die Passwortlänge

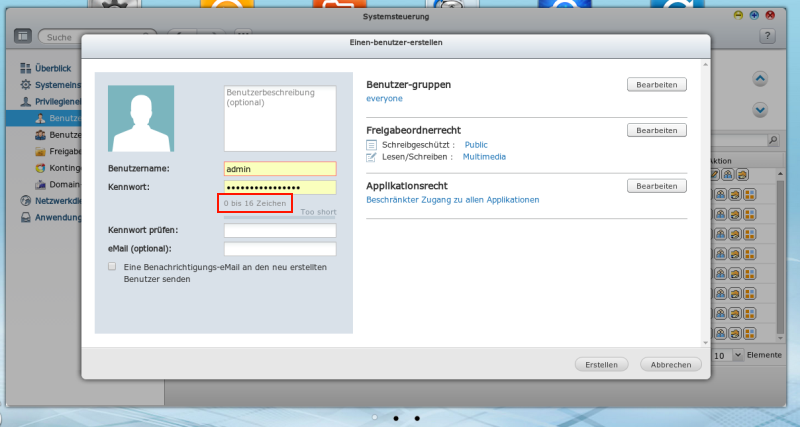
Wenn man bei Google z.B. nach den Schlagworten „qnap max password length“ sucht, findet man einige Treffer zu Foreneinträgen, in denen sich Besitzer von QNAP Netzwerkspeichern über eine Grenze bei der Passwortlänge ärgern. Anscheinend war es sogar mal so, dass die Firmware, Passwörter, die länger als 16 Zeichen waren, einfach abschnitt ohne den User zu informieren.

(Dieses Vorgehen ist auch schon bei einigen anderen Anbietern aufgefallen. Ich erinnere mich noch an AOL und das Sparkasse Onlinebanking. Allerdings ist das schon einige Jahre her.)

In den offiziellen Foren wird seit langer Zeit (Aus-)Besserung versprochen, jedoch gibt es auch bei der aktuellsten Firmware-Version immer noch ein Limit von 16 Zeichen (siehe Screenshot).

QNAP Passwortlänge


Wie es sich für ein NAS gehört, kann man auf das System auch auf andere Art als über das Webinterface zugreifen, z.B. per SSH. Wer allerdings versucht sich hier mit seinem Benutzernamen und 16stelligen Passwort anzumelden, wird sich wundern warum der Login verweigert wird. Angeblich ist das Passwort falsch. Auch im Systemlog des NAS werden die „failed login attempts“ aufgelistet. Nach einiger Fehlersuche ist die Ursache gefunden:

Als Passwort für den SSH-Zugang sind nur die ersten 12 Zeichen gültig! 

Und das 2014! Oh Man. Dokumentiert wird dies natürlich nirgendwo. Jedenfalls habe ich nichts gefunden.

Chrome: libudev.so.0: cannot open shared object file

Nach dem Update von Ubuntu 12.04.2 LTS auf 14.04 LTS startete Google Chrome nicht mehr. Der Aufruf über die Konsole offenbarte die Fehlermeldung

/usr/bin/google-chrome: error while loading shared libraries: libudev.so.0: cannot open shared object file: No such file or directory

Auf einem 64Bit-System lässt sich das Problem mit einem einfachen Kommando lösen:

sudo ln -s /lib/x86_64-linux-gnu/libudev.so.1.3.5 /usr/lib/libudev.so.0

Facebook kauft WhatsApp

Gestern Abend wurde bekannt gegeben, dass Facebook den Messenger WhatsApp für 19 Milliarden Dollar (ca. 13,8 Milliarden Euro) übernehmen wird.

Aus diesem Grund nochmal der Verweis auf den „sicheren“ Messenger Threema. Mehr Infos und ein interessantes Interview mit den Entwicklern gibt es in einem Podcast bei monoxyd.

Android Version: Play Store
iOS Version: App Store

WebGL im Chrome unter Ubuntu

Lenovo hat im Thinkpad W520 sowohl eine Intel GPU als auch eine Karte von Nvidia eingebaut (Stichwort: Optimus) und Google Chrome deaktiviert scheinbar die Unterstützung für WebGL sobald er Optimus-Hardware erkennt. Überprüfbar über den Aufruf von

chrome://gpu/


Zum Aktivieren von WebGL

chrome://flags/

besuchen und hier den (obersten) Punkt „Software-Rendering-Liste überschreiben“ aktivieren. Nach einem Neustart http://www.chromeexperiments.com/webgl besuchen und mit ein paar wunderschönen Demos testen, ob alles funktioniert hat.

Update: Bei aktivierten WebGL brachte Google Maps gelegentlich das komplette System zum Absturz. Hier könnt ihr gezielt die Nicht-WebGL Version von Google Maps aufrufen. Mehr Informationen direkt bei Google: Klick.

Raspberry Pi: Update owncloud beta to owncloud 6

The final release of owncloud 6 is now available. Just like the update how to for beta 3, here is how to install it manually.

Download the update on your owncloud server

pi@raspberrypi ~ $  wget http://download.owncloud.org/community/owncloud-6.0.0.tar.bz2

pi@raspberrypi ~ $  tar xfv owncloud-6.0.0.tar.bz2


Create a backup of the files and database

pi@raspberrypi ~ $  mkdir 2013_12_12_Backup_owncloud_beta3/

pi@raspberrypi ~ $  sudo rsync -a /var/www/owncloud/ /home/pi/2013_12_12_Backup_owncloud_beta3/

pi@raspberrypi ~ $  sudo mysqldump owncloud -u root -p > /home/pi/2013_12_12_Backup_owncloud_beta3/owncloud.sql


Copy the update

pi@raspberrypi ~ $  sudo rsync –inplace -rtv owncloud/ /var/www/owncloud/

pi@raspberrypi ~ $  rm -r owncloud owncloud-6.0.0.tar.bz2


Visiting the webinterface of your installation will complete the update.

Blog migration

I’m moving the whole blog (hosting and domain) to new providers. The hoster has already been changed, dns transfer should follow in a few days.

I also changed the domain of the blog from http://www.carrier-lost.org/blog to just http://www.carrier-lost.org.

Please let me know, if you encounter any error.